
Every stitch has a story, and every color adds a new layer to it.
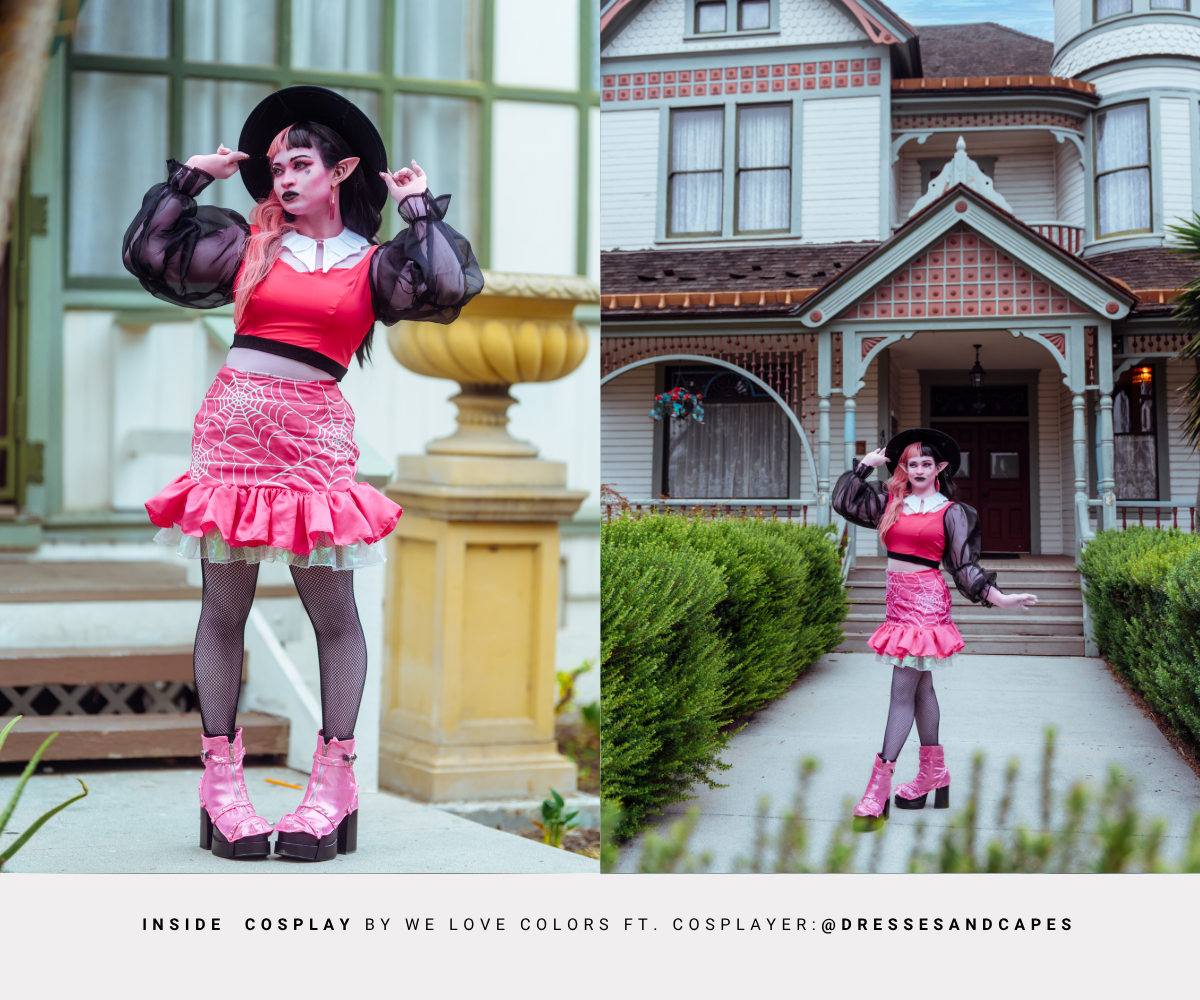
For this edition of Inside Cosplay by We Love Colors, we chatted with Lauren, the creative force behind @DressesandCapes, a maker whose passion for fabric, detail, and imagination brings iconic characters to life.
Her work celebrates dedication, color, and storytelling, and we love how she’s made We Love Colors part of her creative world.
Let’s step inside her process: where ideas spark, challenges turn into clever solutions, and color becomes the language of transformation.
Every cosplay is a journey. Looking at your creations, what is it about a character that first captures your imagination? Could you share the story behind a character and the moment you decided, "I have to bring this character to life!"
Lauren: It is so true, every cosplay is truly a journey. There are so many steps that go into creating a cosplay that are seen and unseen. When I look at a character I first am ensnared by their design. I love a unique design that allows me to put a little bit of a unique spin on the character. While I love creating a character 1 to 1, I enjoy enhancing the design a bit by maybe adding additional details such as more frills or more elaborate fabrics.
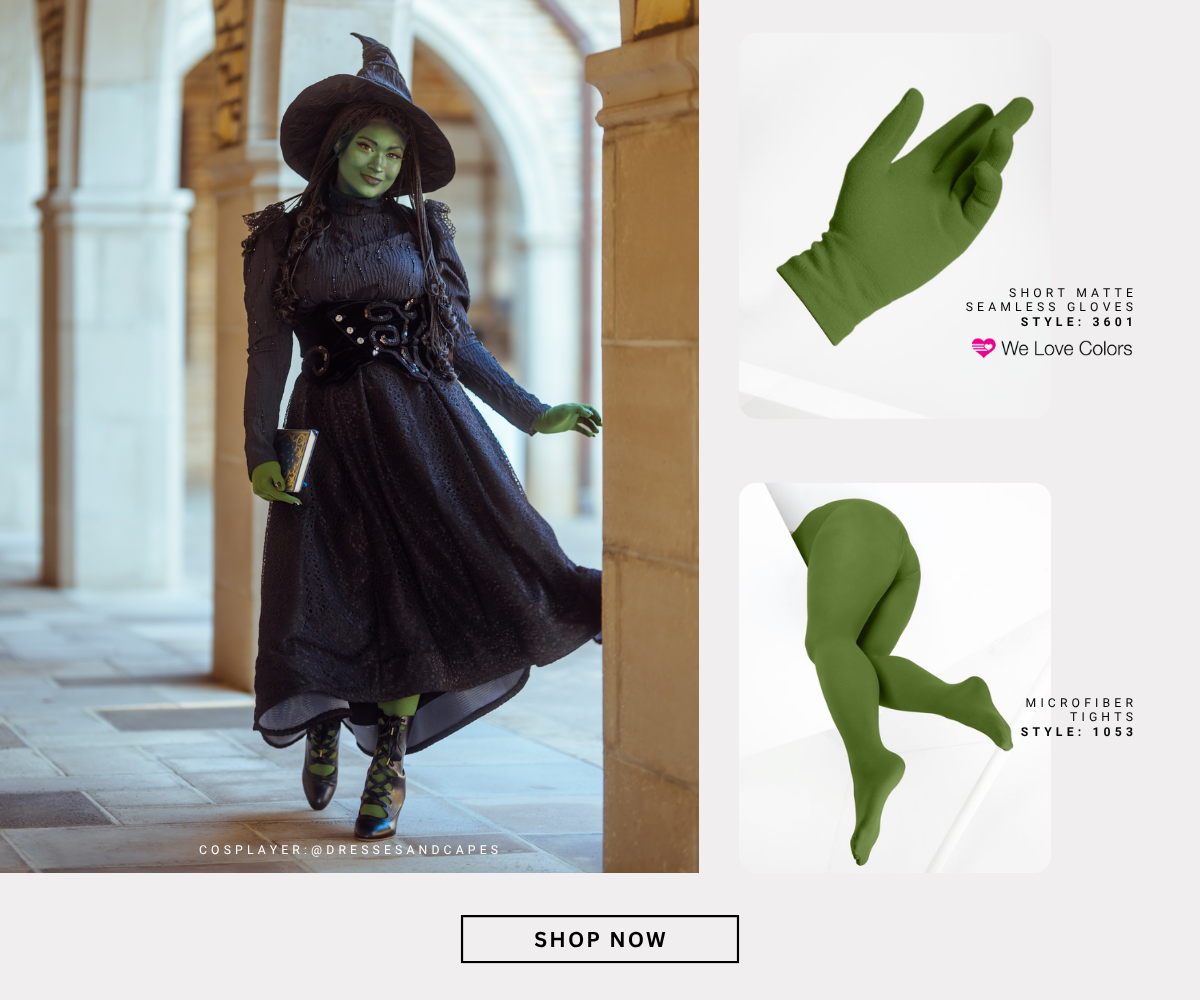
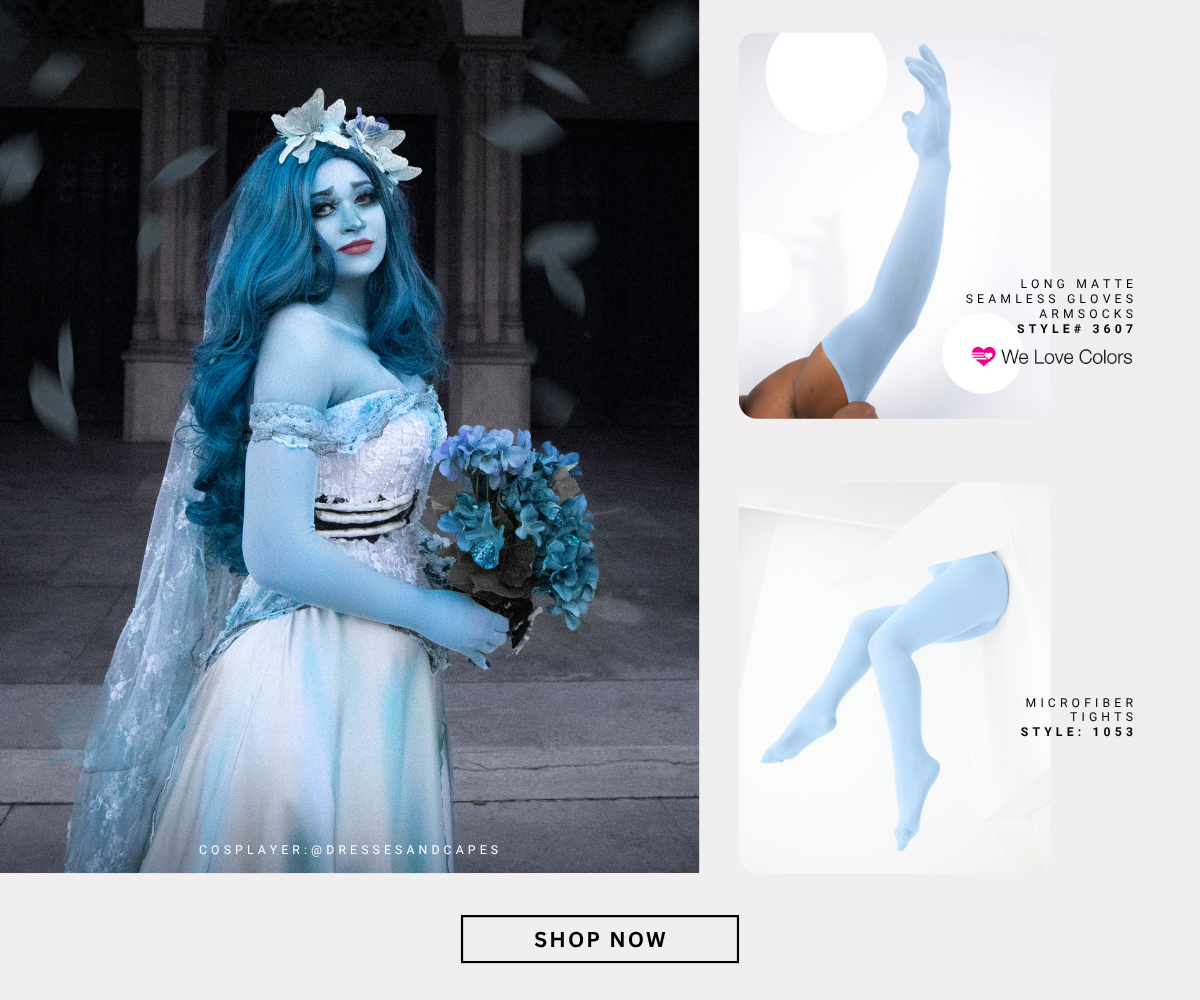
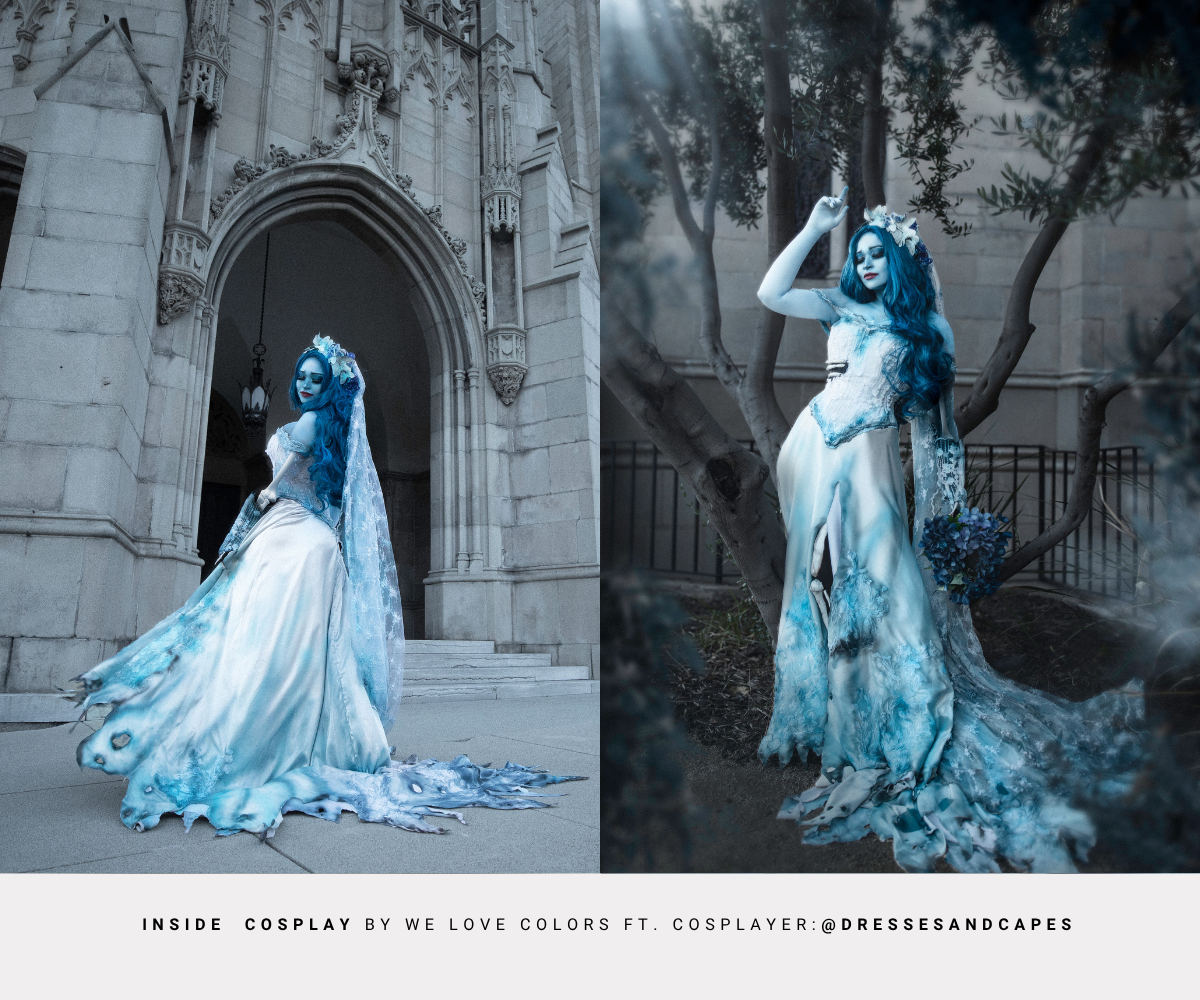
When I first saw “The Corpse Bride” many years ago, I absolutely loved the design of Emily, the aforementioned Bride. For the past few Halloweens I have been doing my Halloween series “Seams and Screams”, where I choose a theme and create three looks based around this theme. A few years ago I chose the theme “Brides of Horror” and I chose Emily from “The Corpse Bride” as one of my creations because I finally felt like my skills on all fronts were finally ready to tackle her look! My sewing and facepaint skills were finally ready to take on her beautiful and unique design!
Your work has a truly professional finish. Can you give us a peek "inside" your creative process? Once you've chosen a character, what are the very first steps you take to break down the project, from gathering references to planning your timeline?
Lauren: First, thank you so much! I work really hard to give my work a professional finish. I am also lucky to be friends with amazing photographers who help create my vision.
My first step in a project is breaking down a character’s look; such as what are the elements of their outfit. Do they have a skirt with several layer elements? Do they have a bodice that requires me creating a corset? Or can I potentially use one I made before? Do I need to create any outlandish understructure that no one will see but is pivotal to the costume?
Once I break down the outfit, then I look at if they need something like facepaint. If I need facepaint then I look at where I may need something like arm socks or a body suit. This is a big thing, as this can be a factor in how I build part of my cosplay. So figuring out these elements of an outfit is very important.
Gathering references and materials does take me quite a while, but I feel very lucky that I am based in Los Angeles, and am near the LA Fashion District where I have easy access to fabric and lots of trims etc. I have also established a friendly relationship with several vendors downtown and they know me and understand my needs.
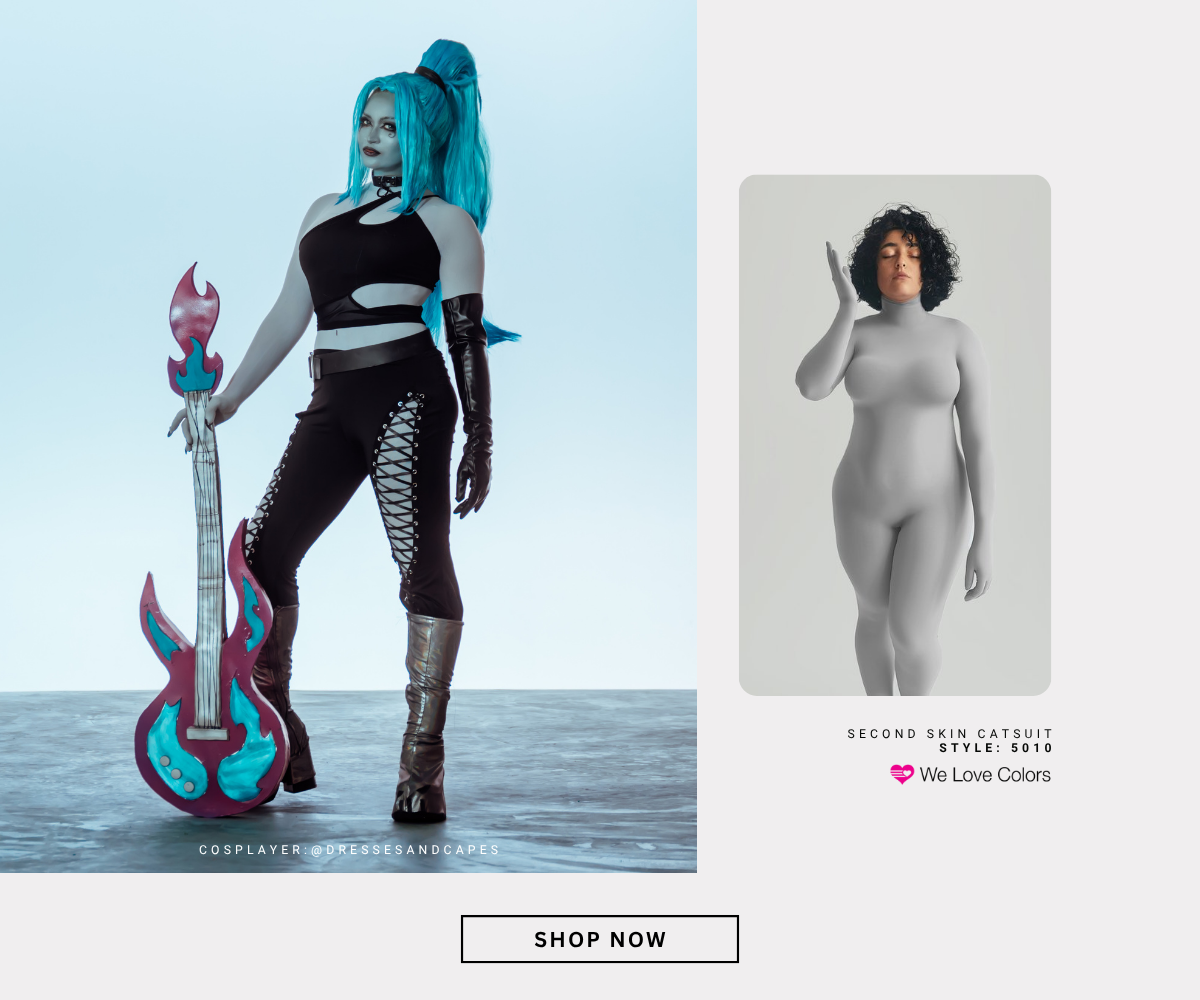
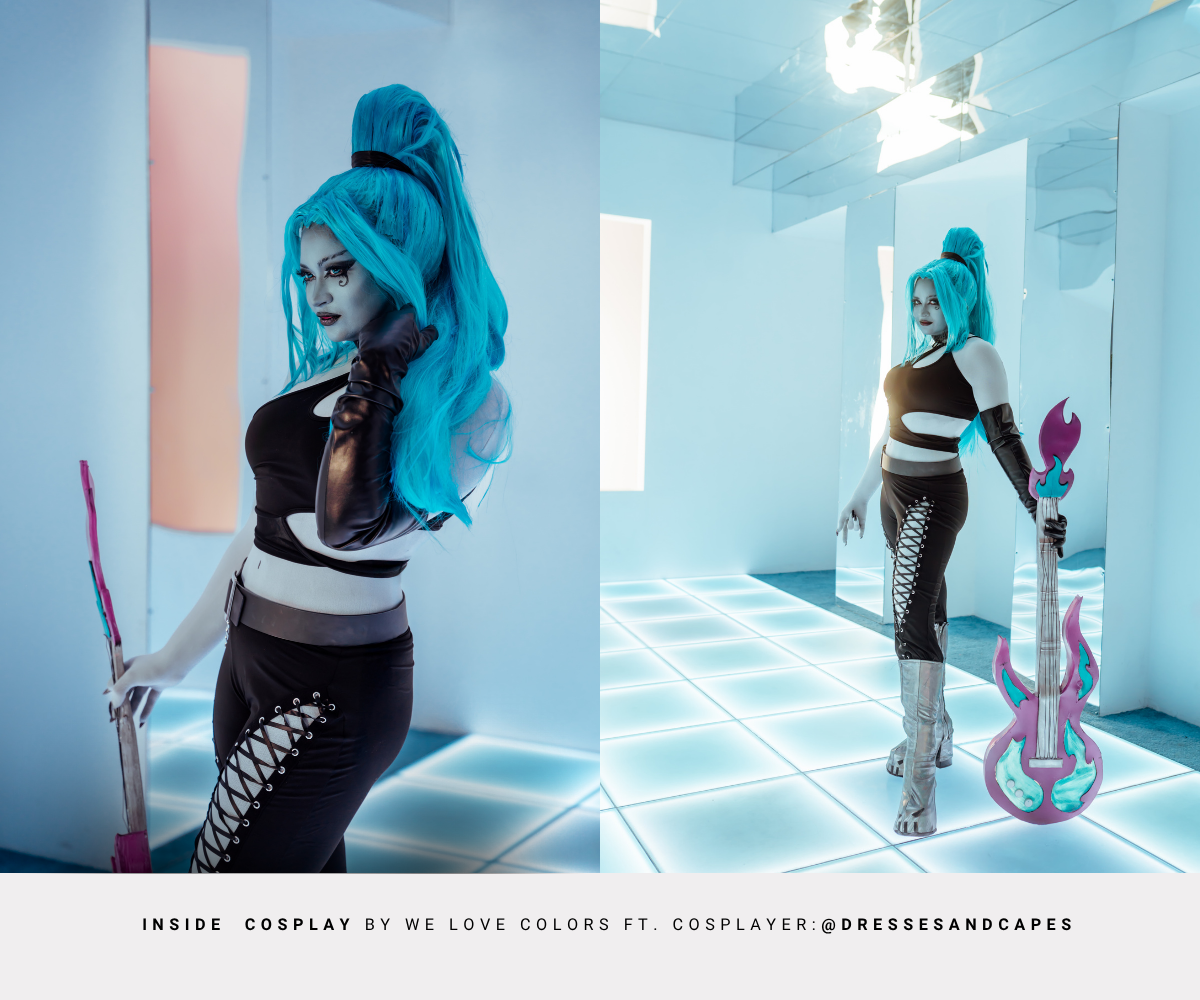
When did you first hear about We Love Colors and which characters have you created using our products? Which cosplay would you highlight? Could you dive into your transformation process for that project? What are your go-to techniques? Airbrushing, hand-painting, dyeing?
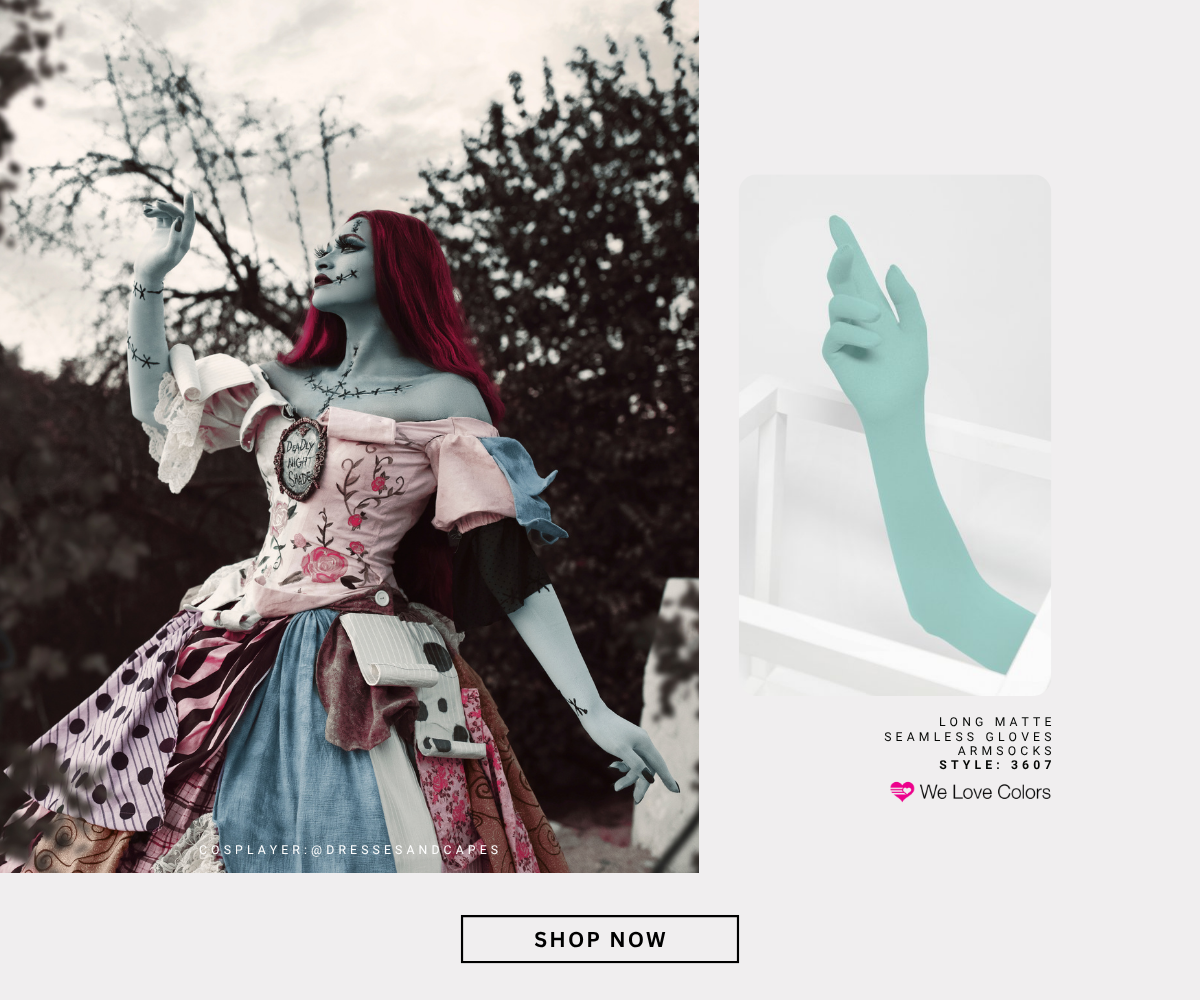
I found out about We Love Colors in 2021, and used them for the first time on my Sally cosplay using their arm socks and leggings. My Sally cosplay was my first big facepaint cosplay to garner attention, and I put a lot of effort into her. She is also a very cumbersome cosplay, hahaha. When I went to do that photoshoot my original plan was to drive myself and get dressed there but because of the sheer volume of the cosplay and all the elements, I ended up having my mom drive me in full cosplay.
When I use my We Love Colors products I always make sure to glue nails onto my hands to give a more realistic look to my arm socks. I also try and do some shading on the arm socks, but I don’t always do this because sometimes I prefer to keep a really clean looking. I also use various We Love Color products depending on the cosplay. Not all cosplays require a full bodysuit. For example, for Sally and Emily I only use arm socks and leggings vs Ember from Danny Fantom I use a full bodysuit.
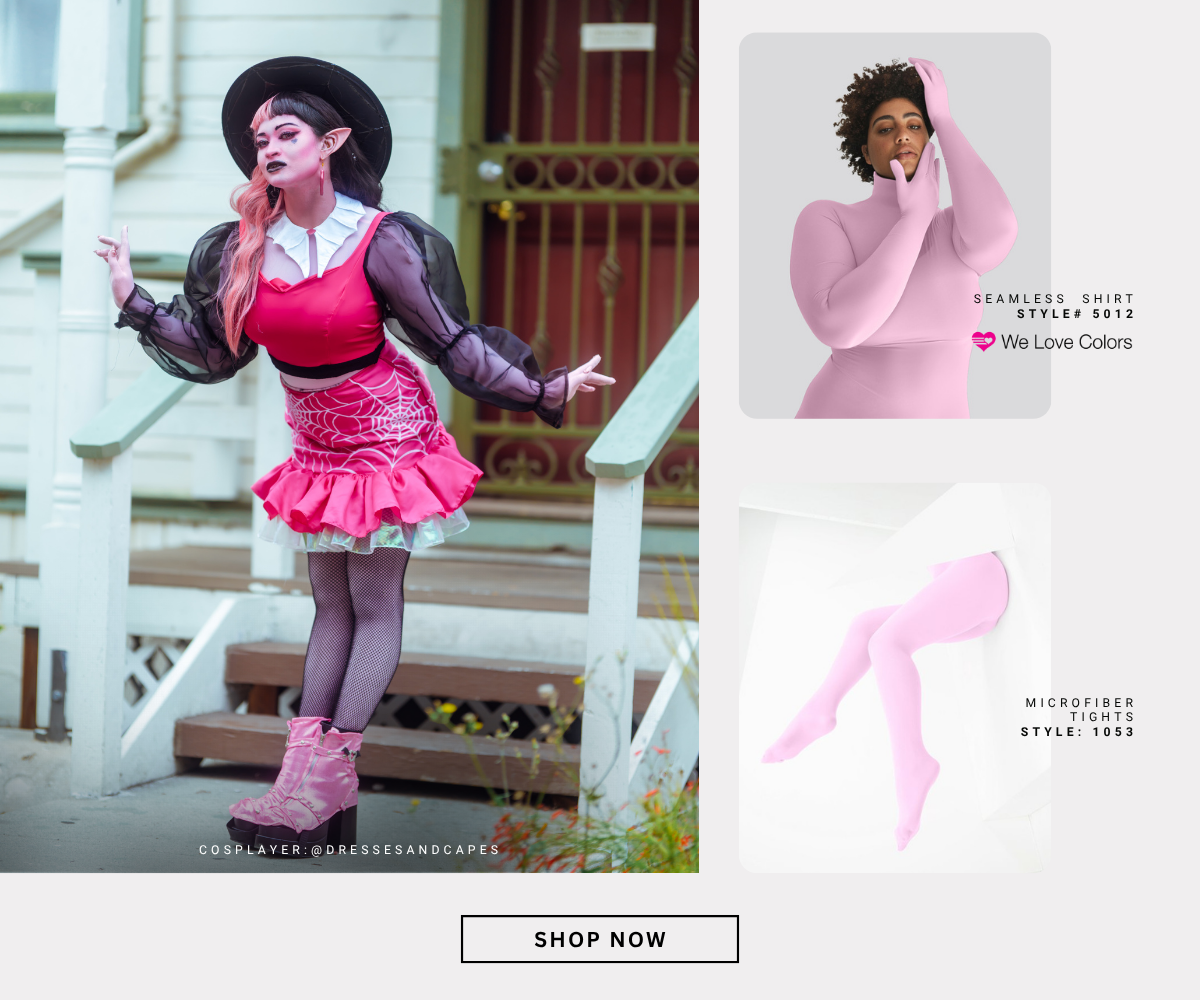
The products I use are determined by the parts of the body that are covered by the cosplay. Also this may be TMI, but you also need to consider how you will go to the bathroom in your cosplay. When I was choosing products for my Draculuara cosplay (soon to be shared on my page), I realized, a bodysuit was probably not the best idea because I would have to take off every piece of her outfit to use the restroom and her outfit has a lot of elements so I chose to do a turtleneck and leggings, and that ended up working out perfectly!
My go-to technique for facepainting is waterbased paint from Mehron. Nothing super fancy but very reliable, and I love that We Love Colors has a chart that helps you match their colors to Mehron paints. Makes it much easier.
Beyond the big equipment, every creator has their secret weapons. What are 3-5 essential tools in your cosplay workshop that you simply couldn't live without? They could be anything from a specific type of needle to a favorite brand of paint or an unconventional hardware store find.
Is it lame to say my sewing machine? Hahaha. But I love my Yaya Han Bernette sewing machine. I am an ambassador for Bernette and was gifted a Bernette sewing machine with embroidery capabilities. I have been slowly learning machine embroidery and oh boy! Is it a whole different world for me. I am not a very computer/technical person so I am learning a lot.
Some of my other essential tools definitely include my self healing cutting mat. I know that may sound lame, but I only got it last year but I do love having it on my cutting table. It is so much nicer than my old cutting mat and makes it so much easier to cut my fabric. In a related element I got a brand new and much nicer rotary cutter from Famore and it is incredibly sharp and much nicer to hold than my previous one. I have been able to use it on a lot more materials and it has made my life so much easier.
Another tool that I adore is beeswax that I use for my hand sewing thread. I really enjoy hand sewing and beeswax is incredibly helpful in preventing thread from tangling while sewing.
The costume is only part of the character. How do you approach your makeup design to perfectly match and blend with your body "skin"? Do you have any favorite products or techniques for creating that smooth transition from your face to the neck of a bodysuit or armsocks?
This part can be incredibly tricky. I have found that finding an element of the costume to help almost hide the blend is the best option with this transition. I usually like to add a small sleeve to help with this, for example in my Emily Corpse Bride cosplay I added a small drape sleeve to help with the transition from paint to arm sock. For Ember, in her original design she had a small choker at her neck that was a perfect transition point from facepaint to bodysuit. You just need to make sure that your body paint goes lower than the suit/armsock and is sealed very well as it may rub off due to the friction of rubbing against the material.
Cosplay is often about brilliant problem-solving. Can you share a story of a time a costume just wasn't working, say a piece broke, a technique failed, or a design was more challenging than you expected…and the creative solution you came up with to save it?
Oh boy! I had so many issues at the beginning of my cosplay career. One time, I decided I wanted to be a fanart version of Pharah from Overwatch. But I also wanted to do her wings and have them move with motors. I worked with a friend who knew computers and electronics to get them to move. While we were able to get them to move before the con, once we were at the con of course the motor stopped working.
I wish I had a story where we found an amazing wiring solution but unfortunately it did not end up working that day. But you know what, those wings still looked great! Even while they were down on my back they looked amazing and I had a great time! Sometimes things don’t work perfectly but you can’t let that prevent you from enjoying yourself. I worked hard on that cosplay and I still love the pictures of it and I had a great time that day with my friends.
Do you have any pro-tips for keeping your cosplays organized and in perfect condition? And have you ever upcycled or re-purposed pieces from an old cosplay to give them new life?
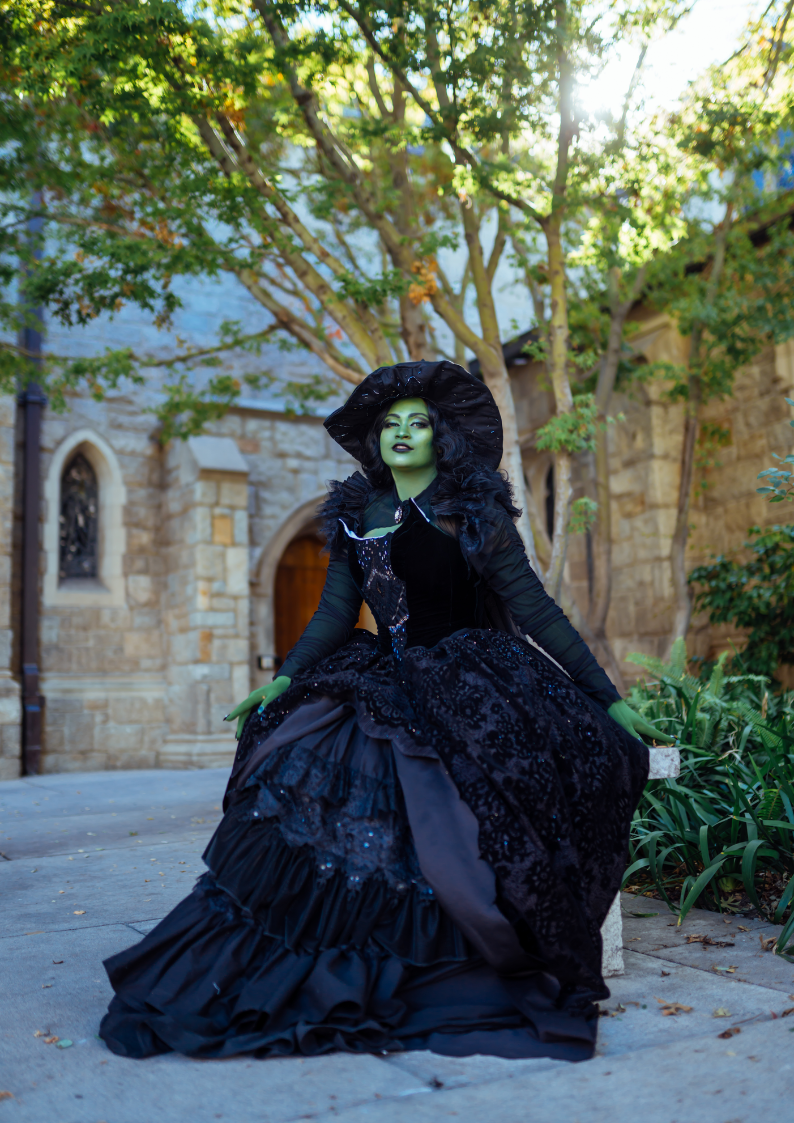
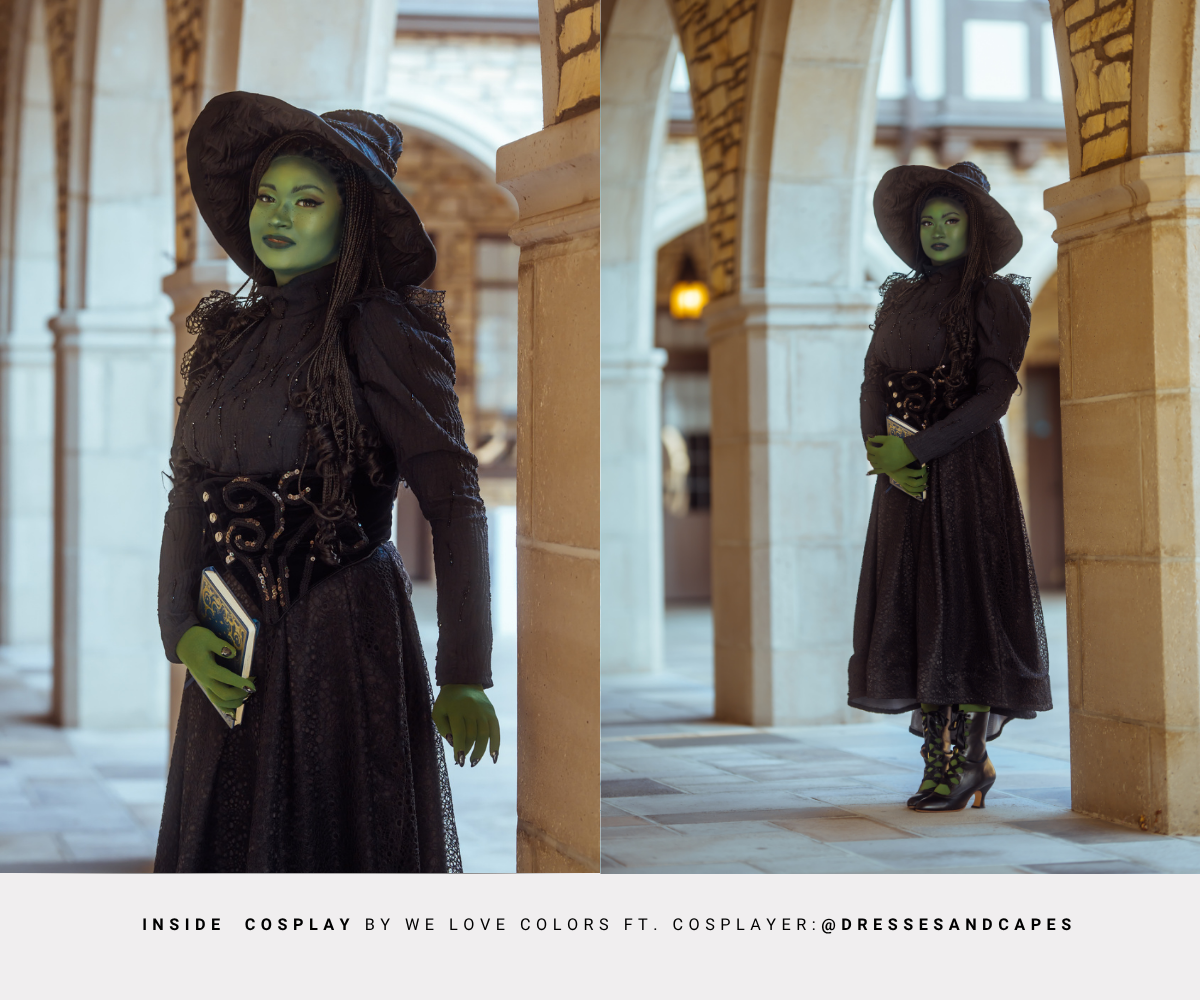
YES! KEEP YOUR COSPLAYS ORGANIZED FOR YOUR OWN SANITY! All my cosplays are in labeled bins or garment bags. Each bin or garment bag has a label that says what is in each storage item, as well as the accessories. If the accessory is used by several cosplays I try to make sure the accessory is labeled on the outside and I also try to put what cosplay that accessory goes with. I also try to put similar cosplays together. For example, I have two Elphaba cosplays, one of my own design and one based on the “Wicked” movie and they are in the same garment bag because they also use the same We Love Color products. Keeping your cosplays labeled and organized will save you so much time and stress in the future. This includes wigs, which I label in bags (if not heavily styled and on a wig head) by character and general style (e.g.; long black wig with bangs), as I generally restyle my wigs and reuse them between cosplays to save money. My Belle wig is also my Sailor Jupiter wig and also my Arrietty wig. I just make sure to wash and restyle it between cosplays.
I obviously have a lot of cosplays and am actually going through a mini purge right now on my social media pages. I am doing a “Roast Myself” series and going through my old cosplays and looking at how my work has improved since I began cosplaying 8-9 years ago and taking my old cosplays apart to salvage any usable bits for future projects. I want to make sure that I don’t waste any elements. I am also looking into collaborating with a brand into recycling fabric. Once this mini purge is done. I am planning a second one at the beginning of next year where I will be potentially selling or giving away slightly better cosplays, but I may also just take them apart and reuse the fabrics because these cosplays have much nicer fabrics than my earlier cosplays.
We are constantly inspired by cosplayers, we see how cosplay requires so much dedication, late nights, meticulous work, a diverse skillset, and creative problem-solving. Through all of that, what is the fundamental joy or sense of purpose you get from this art form that keeps you coming back to your craft time and time again?
I think for me, it is having a creative outlet and being able to inspire others. Throughout all of these projects, I aim to provide guidance and inspiration to others looking to unleash their own creativity.
Lastly, can you share with us your top 3 cosplays from all time and why they are so special to you.
This is such a hard question! I think my top 3 cosplays are
Sally from Nightmare Before Christmas based on art by Julietta_heart
Esmeralda from Hunchback of Notre Dame based on art by pem_designs
Marcille from Delicious in Dungeon
But honestly I don’t know if I truly have a top three. These are just what come to mind at the moment.
How can people connect with you and follow your journey?
You can follow me on Instagram and Tiktok @DressesandCapes
Also make sure to check in during Halloween to see my Halloween series, “Seams and Screams”!
